
Summary of the running network environment
- Pfsense runs as a virtual machine
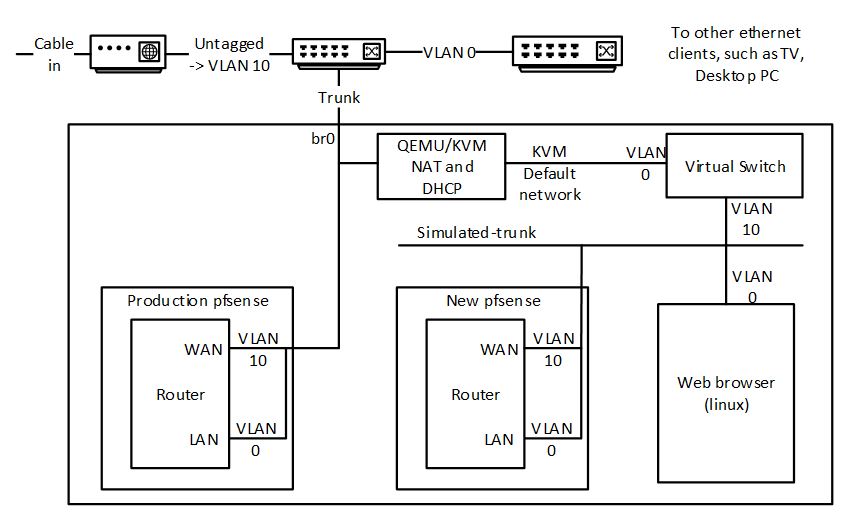
- There is a single trunk Ethernet connected to the host
- The WAN connection arrives on VLAN10, courtesy of a managed switch feeding the trunk
- The LAN connection is untagged
- Additional VLANs provide connectivity for wireless LANs
I discovered that my pfsense was in a state where it could not update itself either from the GUI, or from the command line. The reasons are not relevant to this item. I wanted to rebuild it and keep the same configuration.
The challenge is how to build a pfsense instance with the same configuration, with minimum disturbance of the old configuration.
The solution is to create a virtual network environment that mirrors key aspects of the production environment. The virtual network environment is created using features of the QEMU KVM virtualization environment, and is driving using the virt-manager gui.
- Prerequisites
- Sufficient host resources to run an additional 3 virtual machine instances
- Connectivity to the host via virt-manager that is not dependent on the production pfsense instance
- My host ran a VNC desktop session. I connected to this session from a Windows machine on VLAN0 from an interface that was configured with a static IP address.
- I then ran virt-manager in this session, plus a root terminal to set up instance storage (using zfs).
- Host access to the new pfsense installation image, in my case pfsense 2.4.4 AMD64.
- My internet provider (Virgin Media) did not give me a DHCP lease unless the interface performing DHCP had a specific MAC address. The interface connecting to WAN has to be configured to spoof this address, by specifying the MAC address of the LAN (i.e., the non-tagged physical) interface in pfsense. This configuration persists into the new instance, so the MAC addresses configured in QEMU/KVM for the virtual machines can be anything. This is a necessary, as qemu/kvm doesn’t allow duplicate MAC addresses to be configured.
- Create a new network in kvm that is not connected to anything, and has no IP configuration. Call this simulated-trunk.
- Create a pfsense instance “switch” with two NICs, one connected to the default network (NAT to all physical devices), one connected to simulated-trunk.
- During installation, configure the “default” interface as WAN.
- Configure VLAN 10 on “simulated-trunk” and assign to LAN.
- This instance simulates the hardware managed switch used to place the incoming WAN on VLAN 10.
- Create a pfsense instance “new” with a single NIC on “simulated-trunk”
- During installation, configure VLAN 10 as WAN, and untagged as LAN.
- Create a linux instance “app” of your favourite distro on “simulated-trunk”. This is needed to access the pfsense GUI. This instance will be given an IP address in the 192.168.1.0/24 range.
- Do a backup of the production pfsense GUI “prod” and put it in “app”. There are undoubtedly lots of ways to do this. What I did was to temporarily attach a second NIC to the “app” virtual machine linked to the host “br0”. I could then access host resources and copy the file.
- I also downloaded and saved /root/.ssh/id_rsa used indirectly by my acme configuration.
- Connect to the “new” pfsense gui from “app”, which is probably at 192.168.1.1.
- Install any packages used by the production environment.
- Do a restore from the backup file.
- At this point, if it worked, “new” will reboot. Follow progress on the virt-manager instance console. The boot should complete showing the production interfaces and their assigned IP addresses.
- Pause “prod” and “new” pfsense instances
- In virt-manager, change the network of “new” to its production value (br0 in my case).
- There should be no further need for “app” or “switch”
- Un-pause “new”
- Using a web browser, connect to the “new” gui, now on the production network.
- Go to status/interfaces.
- Renew the IP address of the WAN interface. You should see it get an IP address, which will most likely to be the same one as previously provided.
- Do any final adjustment. In my case, I created /root/.ssh from the console, uloaded /root/.ssh/id_rsa from Diagnostics/Command Line, and set permissions to 400 from the console. I tested that my acme scripts worked, and were placing a copy of the certificates into a directory on my web server using scp.
- Do some sanity testing, but it should all be working now.
- Connect the old “prod” instance of pfsense to the simulated-trunk and power it down, or just power it down. You can keep this as a backup. You can switch back to it by switching the QEMU/KVM settings for the NIC network. Obviously, don’t have them connected to the same network and running at the same time.