Category Archives: Network

Moving from Windows to Linux

I have been a long-term Windows user. I started developing an application under Windows 1 (a disaster due to memory leaks in the OS), I developed device drivers under Windows 3.1. I have 4 computers at home quite happily running Windows 10, and with very little frustration.

Why then should I want to migrate to Linux? There are multiple reasons. Perhaps the most important is that Microsoft has branded most of my hardware unfit to run its next revision of Windows; at some point Windows 10 will cease to be supported and vendors of the various Apps I depend on will stop supporting it. The second reason (and perhaps an equal first) is that I like to tinker, and Linux has plenty of scope for tinkering. Thirdly, I am familiar with running Linux, which I use on my home server. Finally, I wanted to use ZFS to provide management and protection of my filesystem.

But can I drop Windows entirely? Unfortunately not. A couple of the apps I depend on run only in Windows. These are VideoPsalm (which is used to present in Church) and Microsoft Access (which I use to maintain multiple databases, e.g., for a publication I edit).

I would really like to have moved my existing Windows 10 installation into the virtual domain. I never did find a way to do this. I tried virtualizing the nvme PCI hardware in qemu-kvm. I moved my installation to an SSD (where it still booted) and then virtualized this as a raw block device. The boot up in the virtual machine (VM) gave an error on a fetchingly attractive light blue background (gone are the bad old days of dark blue). Booting the Windows 10 installation image and attempted to repair the installation failed. I could boot it in safe mode, but not in normal mode. Eventually I gave up and bought a one-time install license for Windows 10, and for Microsoft Office, which I was able to install in a fresh VM. There I was able to continue to use VideoPsalm and Microsoft Access (Office).

Here is a list of observations from this work:

  • I selected Zorin 16 Core (based on Ubuntu 20.04) as my OS. It has good reviews. The Core version is free, but the existence of paid versions means the features in Core get professional attention. It’s based on Ubuntu 20.04 LTS, which is also well maintaned.
  • I initially installed Zorin 16 to a SSD using ext4 as the filesystem, then I moved the installation to my nvme using the zfs filesystem (separate boot and root pools). I kind-of followed some of the ideas in the Ubuntu ZSYS project, having separate datasets for the root, and each user. However, I did not use the OS option to install on zfs because I have found zsys to be buggy, and in the past it failed me when I needed it most.
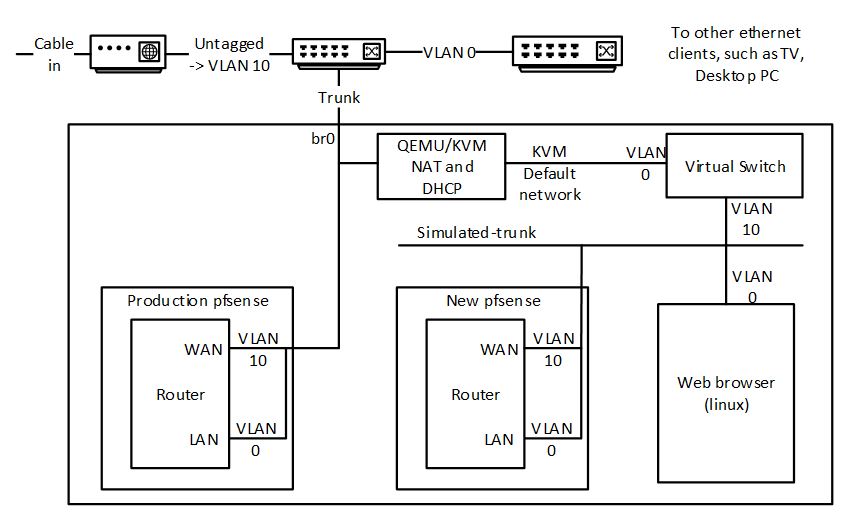
  • Ubuntu 20.04 domain name resolution is a right pain too if you have a local DNS server. I disabled Network Manager and used netplan (rendered by networkd) to define a bridge (needed by the virtual machines) with static IP and DNS settings. If I relied on the values supplied by my DHCP server, the OS would occasionally reset itself so that it resolved only external names, and sometimes didn’t work at all. I never did find out why.
  • Linux apps, in general, do not talk to data on the network directly. I mounted my network resources using nfs in the fstab.
  • Printing proved to be a right royal pain in the posterior. I spent a day messing about with different printer drivers and trying to coerce otherwise functional programs to behave rationally. I ended up insalling Gutenprint drivers for my Canon mx925 printer, and installing a printer using the same connection for each combination of job options (page size, borderless printing, paper type) that I wanted, because applications generally don’t seem to want to remember prior combinations of print options.
  • Sound. Managing sound devices is also a pain in the derriere. Ubuntu 20.04 / Zorin uses Pulse Audio. Some applications work seamlessly (e.g. Zoom). Others support ALSA device selection, or the Pulse Audio default device, such as Audacity and Skype. Evenually I learned to disable a device in Pulse Audio in order to allow Audacity to access it via ALSA, reserving headphones for editing, and my main speakers for everything else. But, Pulse has the annoying habits of randomly changing the “fallback”=default output device, for no reason that I could find. I ended up keeping the Pulse volume control open to manage which device audio should come out of. I also had to edit the pulse config files to specify initial default source and sink, because it appeared to have no memory from boot to boot of device selection.
  • I had to be sensitive to the source of a program: OS-supplied, supplied by a PPA (i.e., an unofficial release for the OS), Snap, Flatpack or AppImage. Snap and Flatpack applications are isolated from much of the machine – for example, limiting the user’s home directory subdirectories that are visible, and making the printer unavailable. Also start-up time for Snap, Flatpack and AppImage applications may be slow. Opera installed from Snap had a 10-second start-up time. This is not acceptable, IMHO.

And comments on specific applications:

  • Thunderbird is my go-to email, calendar and contacts app. Works seamlessly in Linux.
  • Audacity is used for my audio narration. I encountered a number of issues. The latest AppImage (3.1.2) has one feature I use (Noise Reduction) slowed down a factor of seval, and when installed as a Flatpack, it slows down a factor of several more. I had to install an old version (3.0.2) from a PPA, which restored the speed.
  • My image library is managed using Faststone on Windows. I evaluated a number of alternatives on Linux. I wanted to use Shotwell, but found it too unstable – crashing for some drag-and-drop operations. I settled on digiKam, which is way more powerful than I need. However, printing images in digiKam has issues. Using the print tool from the LightTable results in weird cropping aspect ratios, i.e., the first print is OK, but subsequent prints are stretched or squashed. I resorted to printing one-at-a-time using GIMP.
  • Google drive. I was unwilling to pay for a linux replacement. I evaluated some of the free alternatives with no success. So I reduced by dependence on it, and used the gnome ability to see it as a directory under nautilus to drag and drop files into it, rather than accessing files in the Google drive direct from applications.
  • Desktop search. Part of my self-employed work requires me to research in a large corpus of Microsoft Office files. I uses Lookeen (paid) on Windows. After some evaluation, I settled on Recoll under Linux. I did have to work around a system crash that occurred when Recoll indexed my 40GB corpus directly mounted on nfs. I synchronised the files to a local directory (using ownCloud) and Recoll indexed that without issue.
  • Voip client. I was using MicroSIP on Windows. I evaluated the usual suspects on Linux (Linphone, Twinkle). Eventually I was forced to drop the open source choices due to limitations or bugs and go with the free version of Zoiper, which perfectly meets my needs.
  • Brower. My Windows preference is Opera, although there are some websites that don’t like it. Under Linux the limitations of Opera are more evident. I moved to Firefox, which also has support for hardware video acceleration, an added plus.
  • What’s App: there is no native App, but web.whatsapp.com works well enough in a browser.
  • Applications which work seamlessly in both environments:
    • RSS reader: QuiteRSS
    • Video editor: Shotcut
    • Teamviewer
    • Ultimaker Cura
    • FreeCad
    • Zoom
    • Calibre
    • Heidi SQL
    • Inkscape

Towards a cheap and reliable PIR (infrared) motion detector

I thought it would be fun to “play” with the internet of things (IoT) and looked for a suitable project. I assembled a collection of cheap IoT devices into a box, mounted it on my garage wall, and configured software to make it turn on an exterior light when motion of detected.

This is the story of how I did that.

Caveat – this was all done in the sense of a hobby project. It’s not necessarily the best way of achieving the same goal. I’ll share the code at the bottom.

The hardware

I assembled a number of devices together, only two are relevant here, a cheap PIR detector (HW-416B) and a microprocessor ESP8266 NodeMCU. They both can be bought for about £4. I printed a box, wired them together and mounted them high up on the wall of the garage. I have a 20W LED spotlight mounted on the wall and controlled by a Sonoff basic wi-fi relay (costs a few pounds). Finally there is an indoor light (known as the “cat light”, because everybody should have one) controlled by another Sonoff switch, which is used to monitor motion detections.

The PIR sensor provides a digital output, and the NodeMCU just provides access to that digital output. The PIR has controls for sensitivity and hold time, both of which are turned to the minimum value.

Although not essential to the question of detection, the detector box also has a light sensor and a camera.

The software

I had previously experimented with NodeRed, an MQTT server, and Tasmota running on the Sonoff switches.

This time I abandoned NodeRed and switched to Home Assistant (HA), ESPHome and App Daemon. These are all installed in separate Docker containers on my home server (running Docker under Ubuntu). About the only non-standard part of the installation was to put the HA container on both a macvtap network (so it can be discovered by Alexa) and also a network shared with the other two containers.

I built an ESPHome image for the detector and installed it on the NodeMCU using a USB connection. Subsequent changes were done over the air (OTA) using WiFi. Home Assistant discovered the new device using its ESPHome integration.

I wrote an AppDaemon script that did the following:

  • Triggered on changes of state of the motion detector
  • Flashed the internal light for 2s on detected motion
  • Turned on the external light for 30s on detected motion

The light sensor was used to turn on the external light only if the light level was below a certain threshold. The camera was triggered on detected motion.

The thing I noticed (it was hard to miss) is the number of false positive detections of the PIR sensor, even if the sensitivity was turned to its minimum level. I can’t explain why. Sometimes it was stable for hours at a time, and other periods it triggered every 10s or so. I have no idea if this behaviour is electronic or environmental.

I built a tube to “focus” the detector on a patch of gravel on our drive, but that appeared to have little effect on the rate of false triggers.

Clearly this configuration is useless as an actual detector.

So I added another identical detector. I was hoping that false detections would be independent (uncorrelated) but true detections would be correlated. By “correlated” I mean that trigger events happened on both detectors within a certain period of time.

The two-detector configuration fixed the problem of false detections. If I walk up and down the drive, I get a detection. Although both detectors still spontaneously generate false detections, they generally don’t do so that they are close enough together in time to trigger the light.

Future ideas

Perhaps I might build in a microwave radar based proximity detector. I suspect this will be more reliable than PIR. It’s another thing to play with.

The Code

This code comes with no warrantee. It might not work for you. It might cause your house to explode and your cat to have apoplexy. If it does, I’m not to blame.

ESPHome code for motion detector

esphome:
  name: garage_2
  platform: ESP8266
  board: nodemcuv2

wifi:
  ssid: !secret ssid
  password: !secret password
  domain: !secret domain

captive_portal:
logger:
api:
ota:

binary_sensor:
  - platform: gpio
    pin: D1
    device_class: motion
    name: Motion Sensor 2

sensor:
  - platform: uptime
    name: Uptime Sensor
    update_interval: 10s

AppDaemon code

import hassapi as hass
import datetime

class MotionDetector(hass.Hass):

  def initialize(self):

    # Configuration variables
    self.trigInterval = 10    # Interval between m1/m2 triggers to be considered coincident
    self.luxMinPhoto = 10     # minimum light level for a photo
    self.luxMaxLight = 25     # maximum light level to turn on outside light
    self.durationCatFlash = 2 # seconds duration of cat light flash
    self.durationLight = 30   # seconds to turn on outside/garage light
    self.delayPhoto = 1       # seconds from turning on light to taking photo

    # State variables
    self.catTriggered = 0     # Cat light triggered
    self.m1Triggered = 0      # m1 triggered at most trigInterval previous
    self.m2Triggered = 0      # m2 triggered at most trigInterval previous

    # Listen for events
    self.listen_state(self.m1, "binary_sensor.motion_sensor", new='on')
    self.listen_state(self.m2, "binary_sensor.motion_sensor_2", new='on')

  # m1 has been triggered
  def m1(self, entity, attribute, old, new, kwargs):
    self.log(f"m1 {entity} changed from {old} to {new}")

    self.m1Triggered += 1
    self.run_in(self.m1Done, self.trigInterval)       

    # If m2 has been triggered within the last trigInterval
    if self.m2Triggered:
      self.triggered(entity, attribute, old, new, kwargs)

  # m1 trigger interval complete
  def m1Done(self, kwargs):
    self.log(f"m1 Done")
    self.m1Triggered -= 1

  def m2(self, entity, attribute, old, new, kwargs):
    self.log(f"m2 {entity} changed from {old} to {new}")

    self.m2Triggered += 1
    self.run_in(self.m2Done, self.trigInterval)       

    # If m1 has been triggered within the last trigInterval
    if self.m1Triggered:
      self.triggered(entity, attribute, old, new, kwargs)

  def m2Done(self, kwargs):
    self.log(f"m2 Done")
    self.m2Triggered -= 1

  def triggered(self, entity, attribute, old, new, kwargs):
    self.log(f"Triggered {entity} changed from {old} to {new}")
    light_state = self.get_state('switch.garage_light_relay')
    time_now = datetime.datetime.now().time()
    light_level = float(self.get_state('sensor.garage_light_level'))
    
    self.log(f'light level is {light_level}')

    too_early = time_now < datetime.datetime.strptime("06:30", "%H:%M").time()
    too_late = time_now > datetime.datetime.strptime("22:00", "%H:%M").time()
    too_bright = light_level > self.luxMaxLight
    already_on = light_state == 'on'

    self.log(f'time now: {time_now} too_early: {too_early} too_late: {too_late} too_bright: {too_bright} already_on: {already_on}') 

    light_triggered = not too_bright and not too_early and not too_late and not already_on
    if light_triggered:
      # Low light level during waking hours,  trigger garage light
      # don't trigger if already on to avoid turning off a manual turn-on
      self.triggerLight()

    if (light_level > self.luxMinPhoto):
      # enough light for a photo
      self.makePhoto(kwargs)
    else:
      if light_triggered:
        # Can do a photo, but have to wait a bit for it to turn on
        self.log('delayed photo')
        self.run_in(self.makePhoto, self.delayPhoto)   

    # Flash the cat light always
    self.triggerCat()


  # Flash the cat light for 2 s
  def triggerCat(self):
    if  not self.catTriggered:
        self.toggle('switch.cat_light')

    self.catTriggered += 1
    self.run_in(self.catDone, self.durationCatFlash)      


  def catDone(self, kwargs):
    self.log(f"cat Done")

    self.catTriggered -= 1
    if not self.catTriggered:
      self.toggle('switch.cat_light')


  # Turn on garage light for 30s
  def triggerLight(self):
    self.log(f"Trigger Light")    
    self.turn_on('switch.garage_light_relay')
    self.run_in(self.lightDone, self.durationLight)        


  def lightDone(self, kwargs):
    self.log(f"Light Done")
    self.turn_off('switch.garage_light_relay')


  def makePhoto(self, kwargs):
    date_string = datetime.datetime.now().strftime("%Y%m%d-%H%M%S")      
    file_name = f'/config/camera/{date_string}.jpg'
    self.log(f'Snapshot file_name: {file_name}')
    self.call_service('camera/snapshot', entity_id='camera.garage_camera', filename=file_name)

Dockerisation

How to install and use Portainer for easy Docker container management -  TechRepublic

I moved my services from a virtual-machine environment to docker. Here’s how and why.

Let’s start with the “why”. The answer is that it crept up on me. I thought I’d experiment with docker containers, to learn what they did. The proper way to experiment is to do something non-trivial. So I chose one of my virtual machines and decided to dockerise it.

I achieved my objective of learning docker, because I was forced to read and re-read the documentation and become familiar with docker commands and the docker-compose file. Having started I just, er, kept going, until 2 months later, my entire infrastructure was dockerised.

I ended up with the following docker-compose stacks:

apacheserves a few static pages, currently only used by my Let’s Encrypt configuration
wordpressThree WordPress websites for personal and business use. You are looking at one of them.
nextcloudNextcloud installation, using SMB to access my user files
postgresqldatabase for my Gnucash financial records
embyDLNA and media server. Replaces Plex. Used to share music and photos with the TV in the lounge.
freepbxA freepbx installation.
This container appears on my dhcp-net (see below), has its own IP addresses. This is, in part, because it reserves a large number of high-numbered ports for RTP, and I didn’t want to map them.
ftpftp server used by my Let’s Encrypt processes
iotNode-red installation, used for my very limited home automation. Rather than starting with an existing Node-red image, I rolled this one from a basic OS container, basing the Dockerfile on instructions for installing Node-red on Ubuntu. This is another container on my dhcp-net, because it has to respond to discovery protocols from Alexa, including on port 80.
mailIredmail installation. It is highly questionable whether this should have been done, because I ended up with a single container running a lot of processes: dovecot, postfix, amavis, apache. I should really split these out into separate containers, but that would take a lot of work to discover the dependencies between these various processes. Anyhow, it works.
nfsnfs exporter
piwigoGallery at piwigo.chezstephens.org.uk
portainerManage / control / debug containers
proxyNginx proxy directing various SNI (hostname based) http queries to the appropriate container
sambaSamba server
svnSVN server
tgtTarget (ISCSI) server
zabbixMonitor server. Does a good job of checking docker container status and emailing me if something breaks.

One thing missing from docker is the ability to express dependencies between services. For example, my nextcloud container depends on the samba server becuase it uses SMB external directories. I wrote a Makefile to allow me to start and stop (as well as up/down/build) all the services in a logical order.

My docker installation (/var/lib/docker) has its own zfs dataset. This causes docker to use zfs as the copy-on-write filesystem in which containers run, with a probable performance benefit. It also has the side effect of polluting my zfs dataset listing with hundreds (about 800) of meaningless datasets.

One of the needs of many of my servers is to persist data. For example the mail container has thousands of emails and a MySQL database. I needed to persist that data across container re-builds, which assume that you are rebuilding the container from scratch and want to initialse everything.

Each docker-compose stack had its own zfs dataset (to allow independent rollback), and each such stack was only depdenent on data within that dataset. The trick is to build the container, run it (to perform initialization), then docker copy data you want to keep (such as specific directories in /etc and /var) to the dataset, then modify docker-compose.yaml to mount that copy in the appropriate original location. The only fly in the ointment is that docker cp doesn’t properly preserve file ownership, so you may need to manually copy file ownership from the initial installation using chown commands.

Several of the stacks run using the devplayer0/net-dhcp plugin, which allows them to appear as indepdendent IP addresses. A macvtap network would have achieved the same effect, except I would have to have hard-coded the IP addressed into the docker-compose files. The net-dhcp plugin allows an existing dhcp server to provide the IP addresses, which fits better into my existing infrastructure.

At the end of all this, was it worth it? Well, I certainly enjoyed the learning experience, and proving that I was up the challenge. I also ended up with a system that is arguably easier to manage. Next time I update/reinstall my host OS, I think I will find it easier to bring docker up than to bring up the virtual machines, which requires the various virtual machine domains to be exported and imported using various virsh commands.

ZFS tiered storage

This post documents changes I made to my zfs server setup to resolve the issue of slow hard disk access to my performance-sensitive datasets.

The problem

When you access random data on hard disks,  the disks have to seek to find the data.   If you are lucky,  the data will  already be in a cache.  If you are unlucky the disk will have to seek to find it.   The average seek time on my WD Red disks is 30ms.

So although the disks are capable of perhaps hundress of MB/s,  given an optimal read request, given a typical read requests of a virtual hard disk from one of my virtual machine clients,  performance is very much lower.

ZFS already provides

ZFS provides performance optimations to help to alleviate this.   A ZIL (ZFS intention log) is written by ZFS before writing data proper.  This redundant writing provides integrity against loss of power part way through a write cycle,  but it also increases the load on the hard disk.

The ZIL can be moved to a separate disk, when it is called an SLOG (separate log).   Putting it on a faster (e.g. SSD) disk can improve performance of the system as a whole by making writes faster.  The SLOG doesn’t need to be very big – just the amount of data that would be written in a few seconds.   With a quiet server,  I see that the used space on my SLOG is 20 MB.

Secondly there is a read cache.   ZFS attempts to predict reads based on frequency of access,  and caches data in something called an ARC. You can also provide a cache on an SSD (or NVME) device,  which is called a level 2 ARC (L2ARC).   Adding an L2ARC effectively extends the size of the cache.  On my server,  when it’s not doing anything disk-intensive,  I see a used L2ARC of about 50 GB.

The SSD/NVME

A benefit an SSD is that it doesn’t have a physical seek time.  So the performance of random reads is much better than a rotating disk.   The transfer rate is limited by its electronics,  not the rotational speed of the physical disk platter.

NVMEs have an advantage over SATA that they can use multi-lane PCI interfaces and increase the transfer rate substantially over the 6 Gbps limit of today’s SATA.

Local backup

I wanted to improve my ZFS performance over and above the limitations of my Western Digital Red hard disks.   Replacing the 16TB mirrored pool (consisting of 4 x 8 TB disks,  plus a spare) would take 17 x 2 TB disks.  A 2TB Samsung Evo Pro disk in early 2020 costs £350,  and is intended for server applications (5 years warrantee or 2,400 TB written). At this cost,  replacing the entire pool would be almost £6,000 – which is way too expensive for me.  Perhaps I’ll do this in years to come when the cost has come down.

My current approach is to create a fast pool based on a single 2TB SSD,  and host only those datasets that need the speed on this pool.   The problem this approach then creates is that the 2TB SSD pool has no redundancy.

I already had a backup server in a different physical location.  The main server wakes the backup server once a day and pushes an incremental backup of all zfs datasets.

However,  I wanted a local copy on the slower pool that could be synchronized with the fast pool fairly frequently,  and more importantly,  which I could revert to quickly (e.g. by switching a virtual machine hard disk)  if the fast pool datatset was hosed.

So I decided to move the speed-critical datasets to the fast pool,  and perform an hourly incremental backup to a copy in the slow pool.

zrep mechanism

I already used zrep to back up most of my datasets to my backup server.

I added zrep backups from the fast pool datasets to their slow pool backups.   As all these datasets already had a backup on the backup server,  I set the  ZREPTAG environment variable to a new value “zrep-local” for this purpose so that zrep could treat the two backup destinations as distinct.

“I added” above hides some subtlely.  Zrep is not designed for local backup like this,  even though it treats a “localhost” destination as something special.   But the zrep init command with a localhost destination creates a broken configuration such that zrep subsequently consider both the original and the backup to be masters.  It is necessary to go one level under the hood of zrep to set the correct configuration thus:

export ZREPTAG=zrep-local
zrep changeconfig -f $fastPool/$1 localhost $slowPool/$1
zrep changeconfig -f -d $slowPool/$1 localhost $fastPool/$1
zrep sentsync $fastPool/$1@zrep-local_000001
zrep sync $fastPool/$1

A zrep backup can fail for various reasons,  so it is worth keeping an eye on it and making sure that failures are reported to you via email.   One reason it can fail is because some process has modified the backup destination.   If the dataset is not mounted,  such modification should not occur,  but my experience was that zrep found cause to complain anyway.   So I made as part of my local backup a rollback to the latest zrep snapshot before issuing a zrep sync.

Interaction with zfs-auto-snapshot

If you are running zfs-auto-snapshot on your system (and if not,  why not?),  this tool has two implications for local backup.   Firstly,  it attempts to modify your backup pool,  which upsets zrep.  Secondly,  if you address the first problem, you end up with lots of zfs-auto-snapshot snapshots on the backup pool as there is then no reason why these should expire.

You solve the first problem by setting the zfs attribute com.sun:zfs-auto-snapshot=false on all such datasets.

You solve the second problem by creating an equivalent of the zfs-auto-snapshot expire behaviour and running it on the slow pool after performing a backup.

The following code performs this operation:

fastPool=f1
slowPool=p5
zfsLabel=zfs-auto-snap

process_category()
{
# process snapshots for stated zrep-auto-snap category keeping stated number
ds=$1
category=$2
keep=$3
zfsCategoryLabel=${zfsLabel}_$category

snapsToDelete=`zfs list -rt snapshot -H -o name $slowPool/$ds | grep $zfsCategoryLabel | head –lines=-$keep`

for snap in $snapsToDelete
do
zfs destroy $snap
done

}

process()
{
ds=$1
# echo processing $ds
process_category $ds “frequent” 4
process_category $ds “hourly” 24
process_category $ds “daily” 7
process_category $ds “weekly” 4
process_category $ds “monthly” 12
}

# get list of datasets in fast pool
dss=`zfs get -r -s local -o name -H zrep-local:master $fastPool`

for ds in $dss
do
# remove pool name
ds=${ds#$fastPool/}
process $ds
done


ZFS rooted system disaster recovery

I recently had occasion to test my disaster recovery routine for my server, which is Ubuntu 18.04 LTS rooted on zfs.

The cause was that I did a command-line upgrade to 19.10. The resulting system did not boot. I am not exactly sure why. I’d hoped to enjoy a possible disc perforance improvement in 19.10.

Anyhow, after messing around for a while, I decided to revert to before the upgrade. I have a bootable flash drive with Ubuntu 18.04, not running from zfs, but with zfs tools installed.

I booted from the flash drive. Then I zfs rolled-back the /boot and root datasets to before the upgrade. Then I mounted the root dataset to /mnt/root, the boot to /mnt/root/boot, mount –rbind /dev /mnt/dev, and the same for sys, proc and run. Then chroot /mnt/root. Then update-grub (probably unnecessary) and grub-install /dev/sd{abcde}.

That’s it, although it did take 2 hours with inumerable boots and struggling to understand the Supermicro BIOS settings. I think the next time I have to do this, it will take about 30 minutes. Without knowing I could do this reasonably easily, I would never have tried the OS upgrade. The upgrade almost worked, but I’ll wait for the next LTS before trying again.

How to make a home zfs backup server

I have a home file and compute server that provides several TB of storage and supports a bunch of virtual machines (for setup see here: https://chezstephens.org.uk/server-upgrade/). The server uses a zfs 3-copy mirror and automated snapshots to provide what should be reliable storage.

However, reliable as the system might be, is is vulnerable to admin user error, theft, fire or a plane landing on the garage where it is kept. I wanted to create a backup in a different physical location that could step in in the case of disaster.

I serve a couple of community websites, so I’d like recovery from disaster to be assured and relatively painless.

I recently was given a surplus 4-core 2.2 GHz 3 GB HP desktop by a friend. I replaced her hard disk with a 100GB SSD for the system and a 4TB hard disk (Seagate Barracuda) for backup storage (which I already had). I upgraded the memory by replacing 2x512MB with 2x2GB for a few pounds. That’s the hardware complete.

Installing the software

The OS installed was Ubuntu 18.04 LTS. The choice was made because this has long term support (hence the LTS), supports zfs, and is the same OS as my main server. My other choice would have been Debian.

OS install

I wanted to run the OS from a small zfs pool on the SSD. To get the OS installed booted from zfs is relatively straightforward, but not directly supported by the install process. To set this up: install the OS on a small partition (say 10GB), leaving most of the SSD unused. Then install the zfs utilities, create a partition and pool (“os”) on the rest of the SSD, copy the OS to a dataset on “os”, create the grub configuration and install the boot loader. The details for a comprehensive root install are here: https://github.com/zfsonlinux/zfs/wiki/Ubuntu-18.04-Root-on-ZFS. I used a subset of these instructions to performs the steps shown above.

VNC install

I set up VNC to remotely manage this system. You can follow the instructions here: https://www.digitalocean.com/community/tutorials/how-to-install-and-configure-vnc-on-ubuntu-18-04. I never did get vncserver running from the user’s command-line to work. But it works fine as that user started as a system service, with the exception that I don’t have a .Xresources file in my home directory. This lack doesn’t appear to have any effect, apart from some icons are missing from the start menu. As this doesn’t bother me, I didn’t spend any time trying to fix it.

So the system boots up from zfs, and after a pause I can connect to it from VNC.

QEMU install

I followed the instructions here: https://www.linuxtechi.com/install-configure-kvm-ubuntu-18-04-server/, except I didn’t follow the instructions for creation of the bridge.

For the networking side, I followed the instructions here: https://linuxconfig.org/install-and-set-up-kvm-on-ubuntu-18-04-bionic-beaver-linux.

I installed virt-manager and libvirt-daemon-driver-storage-zfs. I could then create virtual machines with zvol device storage for virtual disks.

Backup Process

The backup server was configured to pull a backup from the production server once a day, and to sleep when not doing this. I suppose the reason to sleep is to save electricity. A Watt of power amounts to about £1.40 a year. So this saves me about £30 pounds a year.

The backup process runs from a crontab entry at 2:00am. The process ends by setting a suspend until 1:50 the next morning using this code:

!/bin/sh
target=date +%s -d 'tomorrow 01:50'
echo “sleeping”
/usr/sbin/rtcwake -m mem -t $target
echo “woken”

A pool (“n2”) on the backup server (“nas3”) was created in the 4TB disk to hold the backups. Each dataset on the production server (“shed9” **) was copied to the backup server using zfs send and recv commands. Because I had a couple of TB of data, this was done by temporarily attaching the 4TB disk to the production server.

The zrep program (http://www.bolthole.com/solaris/zrep/) provides a means of managing incremental zfs backups.

The initial setup of the dataset was equivalent to:

from=shed9
to=nas3
frompool=p5
topool=n2
ssh=”ssh root@shed9″

# Delete any old zrep snapshots on source

$ssh "zfs list -H -t snapshot -o name -r $frompool/$1 | grep zrep | xargs -n 1 zfs destroy"

# Use the following 3 lines if actually copying
zfs destroy -r $topool/$1

$ssh "zfs snapshot $frompool/$1@zrep_000001"

$ssh "zfs send $frompool/$1@zrep_000001" | zfs recv $topool/$1

# Set up the zrep book-keeping

$ssh "zrep changeconfig -f $frompool/$1 $to $topool/$1" zrep changeconfig -f -d $topool/$1 $from $frompool/$1

$ssh "zrep sentsync $frompool/$1@zrep_000001"

And the periodic backup script looks like this:

# Find last local zrep snapshot

lastZrep=`zfs list -H -t snapshot -o name -r $pool/$1 | grep zrep | tail -1`

# Undo any local changes since that last snapshot

zfs rollback -r $lastZrep

# Do the actual incremental backup

zrep refresh $pool/$1

The normal (i.e., what it was clearly designed to support) use of zrep involves a push from production to the backup server. My use of it requires a “pull” because the production server doesn’t know when the backup server is awake. This reversal of roles complicates the scripts resulting in those above, but it is all documents on the zrep website. Another side effect is that the resulting datasets remain read-write on the backup server. Any changes made locally are discarded by the rollback command each time the backup is performed.

Creating the backup virtual machines

Using virt-manager, I created virtual machines to match the essential virtual machines from my production server. The number of CPUs and memory space were squeezed to fit in the reduced resources.

Each virtual machine is created with the same MAC address as on the production server. This means that both copies cannot be run at the same time, but it also creates least disruption switching from one to the other as ARP caches do not need to be refreshed.

I also duplicated the NFS and Samba exports to match the production machine.

I tested the virtual machines one at a time by pausing the production VM and booting up the backup VM. Note that booting a backup copy of a device dataset is safe in the sense that any changes made during testing are rolled back before doing the incremental backup. It also means you can be cavalier with pulling the virtual plug on the running backup VM.

How would I do a failover?

I will assume the production server is dead, has kicked the bucket, has shuffled off this mortal coil, and is indeed an ex-server.

I would start by removing the backup & suspend crontab entry. I don’t think a rollback would work while a dataset is open by a virtual machine, but I don’t want to risk it.

I would bring up my pfsense virtual machine on the backup. Using the pfsense UI, I would update the “files” DNS server entry to point to the IP address of the backup. This is the only dependency that the other VMs have on the broken server. Then I would bring up the essential virtual machines. That should be it.

Given that the most likely cause of the failover is admin error (rm -rf in the wrong place), recovery from failover would be a hard-to-predict partial software rebuild of the production server. If a plane really did land on my garage, recovery from failover may take a little longer depending on how much of the server hardware is functional when I pull it from the wreckage. And on that happy note, it’s time to finish.

**
For what it’s worth, this is the 9th generation of file server. They started off running the shed before moving to the garage at about shed7. But the name stuck.

How to move a Linux system rooted on zfs onto a new pool / disk

The motivation for this action was that I had a fully-loaded (6-drive) NAS using RAIDZ2 across the 6 x WD Red 8TB disks.   I wanted to optimize performance and noticed that a common thread on the internet is that this is a poor choice for performance.   Studying the documentation shows that RAIDZ2 is also a poor choice for flexibility – i.e., you cannot easily take a disk out of such an array and repurpose it.

So I decided to bite the bullet and move my zpool contents to a new mirror-based pool.
My NAS build is fairly recent, so the entire data will fit on a single disk.  It’s also an opportunity
to throw stuff I don’t need to keep away.

For first zfs set up,  I followed much of the following:  https://github.com/zfsonlinux/zfs/wiki/Ubuntu-18.04-Root-on-ZFS

This is what I did to move to the new pool:

  1. Checked my backup was up to date and complete.
  2. Offlined one of the devices of the RAIDZ2 array. This left the original pool in a degraded, but functional state.
  3. Cleared the disk’s partition table with gdisk (advanced)
    1. Note, I tried re-using the disk (partition2) as a new pool.   ZFS was too clever for that, and knew it was part of an existing pool (even with -f).  Even when I’d overwritten the start of the partition with zeros,  zfs still knew.  It think it must associate the disk serial number in the original pool.
    2. The way I bludgeoned zfs into submission was to overwrite the partition table, and physically move the device to a new physical interface (in my case to a USB3/SATA bridge).  I don’t know if both of these were necessary.
  4. Created a new pool on the disk.  Note,  zfs wouldn’t create it on the partition I’d set up, but would on the whole disk.  Some of the work in 3.2 above might have been unnecessary.
  5. Copied each dataset I wanted to keep onto the new disk using zfs send | zfs recv. Note that this loses the snapshot history.
  6. Set the new root dataset canmount=off, mountpoint=none.  If you don’t do this, the boot into the new root will fail,  but you can recover from this failure by adjusting the mountpoint from the recovery console and continuing.
  7. In the new copied root, use the mount –rbind procedure to provide proc, sys, dev and boot.  Chroot to the new root. (see https://github.com/zfsonlinux/zfs/wiki/Ubuntu-18.04-Root-on-ZFS).  In the chroot:
    1. update-initramfs updates the new /boot.
    2. update-grub to create the new /boot/grub/grub.cfg file.
      1. I edited this to change the name of the menuentry to “Ubuntu <pool-name>” so that I could be sure I was booting the right pool.
    3. grub-install on one of the old disks
      1. The zfs pool on the whole disk means there is nowhere for the grub boot loader on the new pool disk.   As the old pool disks were physically present and did have the necessary reserved space,  I could use one of them to store the updated boot loader.
  8. reboot, select BIOS boot menu,  boot off the hard disk with the new grub installation
  9. This should boot off the new pool.
  10. Export the old pool.
    1. You might need to stop services such as samba and nfs that are depedent on the old pool first.
  11. Set up mountpoints from the new datasets
  12. Edit any other dependencies on the new pool name (e.g. virtual machine volumes)
  13. Now you are running on the new pool.
  14. Once you are absolutely sure you have everything you need from the old pool, import it and then destroy it.
  15. Do a label clear on each of the partitions to be used in the new new pool.
  16. Create the new new pool using the disks from the old pool.
  17. Repeat 5-14 to move everything to the new new pool. Except,  install the grub bootloader on all the disks used by the pool, excluding the one booting the new pool.
    1. This means you can boot into the new pool if the new new pool is broken.
  18. Export the new pool.
    1. Keep the disk for a while in case you left anything valuable behind on the move to the new new pool.
  19. Eventually, when you are happy that nothing was left behind,  import, destroy and labelclear the disk/partition used for the new pool,  and add the disk/partition to the new new pool.  Also update the boot loader on the disk that was booting the new pool.

Upgrading pfsense using a virtual environment

Summary of the running network environment

  • Pfsense runs as a virtual machine
  • There is a single trunk Ethernet connected to the host
  • The WAN connection arrives on VLAN10, courtesy of a managed switch feeding the trunk
  • The LAN connection is untagged
  • Additional VLANs provide connectivity for wireless LANs

I discovered that my pfsense was in a state where it could not update itself either from the GUI, or from the command line.   The reasons are not relevant to this item.   I wanted to rebuild it and keep the same configuration.

The challenge is how to build a pfsense instance with the same configuration, with minimum disturbance of the old configuration.

The solution is to create a virtual network environment that mirrors key aspects of the production environment.   The virtual network environment is created using features of the QEMU KVM virtualization environment, and is driving using the virt-manager gui.

  • Prerequisites
    • Sufficient host resources to run an additional 3 virtual machine instances
    • Connectivity to the host via virt-manager that is not dependent on the production pfsense instance
      • My host ran a VNC desktop session. I connected to this session from a Windows machine on VLAN0 from an interface that was configured with a static IP address.
      • I then ran virt-manager in this session, plus a root terminal to set up instance storage (using zfs).
    • Host access to the new pfsense installation image, in my case pfsense 2.4.4 AMD64.
    • My internet provider (Virgin Media) did not give me a DHCP lease unless the interface performing DHCP had a specific MAC address. The interface connecting to WAN has to be configured to spoof this address, by specifying the MAC address of the LAN (i.e., the non-tagged physical) interface in pfsense.   This configuration persists into the new instance, so the MAC addresses configured in QEMU/KVM for the virtual machines can be anything.  This is a necessary, as qemu/kvm doesn’t allow duplicate MAC addresses to be configured.
  • Create a new network in kvm that is not connected to anything, and has no IP configuration. Call this simulated-trunk.
  • Create a pfsense instance “switch” with two NICs, one connected to the default network (NAT to all physical devices),  one connected to simulated-trunk.
    • During installation, configure the “default” interface as WAN.
    • Configure VLAN 10 on “simulated-trunk” and assign to LAN.
    • This instance simulates the hardware managed switch used to place the incoming WAN on VLAN 10.
  • Create a pfsense instance “new” with a single NIC on “simulated-trunk”
    • During installation, configure VLAN 10 as WAN, and untagged as LAN.
  • Create a linux instance “app” of your favourite distro on “simulated-trunk”. This is needed to access the pfsense GUI.  This instance will be given an IP address in the 192.168.1.0/24 range.
  • Do a backup of the production pfsense GUI “prod” and put it in “app”. There are undoubtedly lots of ways to do this.  What I did was to temporarily attach a second NIC to the “app” virtual machine linked to the host “br0”.  I could then access host resources and copy the file.
    • I also downloaded and saved /root/.ssh/id_rsa used indirectly by my acme configuration.
  • Connect to the “new” pfsense gui from “app”, which is probably at 192.168.1.1.
    • Install any packages used by the production environment.
    • Do a restore from the backup file.
    • At this point, if it worked, “new” will reboot. Follow progress on the virt-manager instance console.  The boot should complete showing the production interfaces and their assigned IP addresses.
  • Pause “prod” and “new” pfsense instances
  • In virt-manager, change the network of “new” to its production value (br0 in my case).
  • There should be no further need for “app” or “switch”
  • Un-pause “new”
  • Using a web browser, connect to the “new” gui, now on the production network.
    • Go to status/interfaces.
    • Renew the IP address of the WAN interface. You should see it get an IP address, which will most likely to be the same one as previously provided.
    • Do any final adjustment. In my case, I created /root/.ssh from the console,  uloaded /root/.ssh/id_rsa from Diagnostics/Command Line, and set permissions to 400 from the console.  I tested that my acme scripts worked, and were placing a copy of the certificates into a directory on my web server using scp.
  • Do some sanity testing, but it should all be working now.
  • Connect the old “prod” instance of pfsense to the simulated-trunk and power it down, or just power it down. You can keep this as a backup.  You can switch back to it by switching the QEMU/KVM settings for the NIC network.  Obviously,  don’t have them connected to the same network and running at the same time.

Network update

Following the server update,  I thought it was time to update the network.

Historic view of the network:

  1. Earliest network, circa 1998 – 9600 bps ntlworld modem dial-up
  2. First cable modem,  circa 2000, from memory, 1Mbps speed.   As I was working from home, I installed a firewall (3M), switch (10 Mbps), a WiFi access point and Ethernet to a couple of computers.
  3. The speed increased as various upgrades from ntl were provided.  At some point it exceeded 10 Mbps,  at which point, I relied on an ntlworld cable modem also acting as router and WiFi access point.  Time passes…
  4. Circa 2014, Virgin Media hub 2 had endless problems.   Reverted to cable modem sans router/wi-fi, with separate router,  being a Western Digital MyNet 600.  Cisco AP added.  Ethernet to garage and shed.  100 Mbps switches throughout.
  5. Updated server.  Update Virgin media service to 200 Mbps.  Hence the need to update my network infrastructure as the WD router was 100 Mbps only.

So this is the starting point for the new infrastructure:

  • VM modem providing 200 Mbps, not acting as router or access point
  • Single Ethernet cable to garage hosting my sparkling new server
  • Cisco AP, and Western Digital AP re-usable
  • 1 Gbps 48 port switch in the house

I installed pfsense on my server in the garage to handle firewall/router activities.

I bought a netgear 8-port managed switch,  and used the cable to the garage as a trunk to carry the WAN connection on a VLAN.  That means if I do a speed test from the house to Ookla, for example,  the WAN traffic traverses the cable to the garage twice,  once on a VLAN destined for pfsense running as a virtual machine on my server,  and once one the way back to the client device running the speed test (Windows 10 PC in the house).  I suppose this might eventually become a bottleneck, but at the moment it is not.

I also reconfigured the Cisco AP to support VLANs,  and provided additional VLANs from the router to support secure and guest traffic via two SSIDs.  Guest network managed by rules in the pfsense firewall to prevent access to the secure network.

I re-used the WD MyNet by installing OpenWRT v18.  This allows a similar setup to the Cisco AP,  except that its switch doesn’t allow a single port to support both tagged and untagged traffic.

I also set up OpenVPN on pfsense to support remote access to the network.

The final result:
200 Mbp+ observed on Ookla from house PC.
1 Gbps between all wired devices (except MyNet).
Cisco AP and MyNet both supporting two networks for secure and guest access.


My wordpress sites were hacked :0(

I serve a couple of wordpress sites.   These were hacked on Sunday (2018-08-12).

The symptoms of the hack were:

  • <head> element of page is dynamically altered to include a call to polonofiex.ga/sim.js
  • this script redirects the browser window to an adware site, and creates a cookie to avoid reentering the adware site for some period of time.
  • polonofiex.ga/sim.js is the result of a call to src.eeduelements.com/get.php.   I surmise the indirection is so that different sites can be used to host the “sim.js” code.
  • The src.eeduelements.com/get.php reference is inserted through a corrupted jQuery.js: cdn.eeduelements.com/jquery.js?ver=1.0.9
  • You can find this in your theme header.php files.

I cleaned one of the sites (the much more complex one) by blowing away the directories,  unpacking a clean wordpress,  overwriting with selected files from a copy of the old tree for media.  Re-installing the plugins.  Installed wordfence to beef up security.  Note, I left the database in place.

I cleaned the simpler site by installing wordfence and running a scan.   This repaired a core file (header.php) infected with the jquery change.  I deleted and re-installed my theme.   Time will tell whether the infection re-appears,  but I’m hoping wordfence will help.