Relaxing holiday in Oia, Santorini, Greece.

An enjoyable week of warm weather and sunshine; a beautiful property; supportive local staff.

Plusses:

  • The property managers looked after us well. They arranged a porter to take us from the taxi to the property on arrival, and pick us up on departure.  A porter is not a luxury, because it is 80 twisty steps down from the main path to the property.

  • The property is simple and beautiful. It is on two levels with a balcony view from each.  At the top level is a hot tub with a view of the caldera.  At the lower level is the bedroom, with a view of the caldera/ocean from our bed.

  • We did not expect to be brought breakfast every morning. They arranged for breakfast for two to be delivered.  This included an egg sandwich or eggs and peppers, plus home-made breads, croissants and buns as well as fresh orange.
  • Santorini is beautiful. When the sun shines, it is hard to take a bad photo.  The people are welcoming.   The food is good.

  • My wife likes cats. There are lots of them.  They are everywhere and friendly.  We even had one jump on the bed while we were in it.

  • This was the quiet season. While there were busy times corresponding to the arrival of a cruise ship causing a momentary crush, most of the time the streets were quiet and there was plenty of room in restaurants.
  • We went on a sunset cruise. Not cheap,  but well worth it.

Negatives:

  • Last minute did not provide us contact details for the property, even though they told us we had to contact the property to arrange arrival. It took an hour to two of telephone conversations with last minute and following up wrong numbers to finally make contact with the property managers.
  • The geography is very up and down. If you find stairs difficult, you need to be very careful where to stay.
  • November seems to be building/renovation time. From 8:00am, the jack-hammers were busy a few houses away.  On the final day they started work on the property adjacent, and the noise in the property was loud.

How to move a Linux system rooted on zfs onto a new pool / disk

The motivation for this action was that I had a fully-loaded (6-drive) NAS using RAIDZ2 across the 6 x WD Red 8TB disks.   I wanted to optimize performance and noticed that a common thread on the internet is that this is a poor choice for performance.   Studying the documentation shows that RAIDZ2 is also a poor choice for flexibility – i.e., you cannot easily take a disk out of such an array and repurpose it.

So I decided to bite the bullet and move my zpool contents to a new mirror-based pool.
My NAS build is fairly recent, so the entire data will fit on a single disk.  It’s also an opportunity
to throw stuff I don’t need to keep away.

For first zfs set up,  I followed much of the following:  https://github.com/zfsonlinux/zfs/wiki/Ubuntu-18.04-Root-on-ZFS

This is what I did to move to the new pool:

  1. Checked my backup was up to date and complete.
  2. Offlined one of the devices of the RAIDZ2 array. This left the original pool in a degraded, but functional state.
  3. Cleared the disk’s partition table with gdisk (advanced)
    1. Note, I tried re-using the disk (partition2) as a new pool.   ZFS was too clever for that, and knew it was part of an existing pool (even with -f).  Even when I’d overwritten the start of the partition with zeros,  zfs still knew.  It think it must associate the disk serial number in the original pool.
    2. The way I bludgeoned zfs into submission was to overwrite the partition table, and physically move the device to a new physical interface (in my case to a USB3/SATA bridge).  I don’t know if both of these were necessary.
  4. Created a new pool on the disk.  Note,  zfs wouldn’t create it on the partition I’d set up, but would on the whole disk.  Some of the work in 3.2 above might have been unnecessary.
  5. Copied each dataset I wanted to keep onto the new disk using zfs send | zfs recv. Note that this loses the snapshot history.
  6. Set the new root dataset canmount=off, mountpoint=none.  If you don’t do this, the boot into the new root will fail,  but you can recover from this failure by adjusting the mountpoint from the recovery console and continuing.
  7. In the new copied root, use the mount –rbind procedure to provide proc, sys, dev and boot.  Chroot to the new root. (see https://github.com/zfsonlinux/zfs/wiki/Ubuntu-18.04-Root-on-ZFS).  In the chroot:
    1. update-initramfs updates the new /boot.
    2. update-grub to create the new /boot/grub/grub.cfg file.
      1. I edited this to change the name of the menuentry to “Ubuntu <pool-name>” so that I could be sure I was booting the right pool.
    3. grub-install on one of the old disks
      1. The zfs pool on the whole disk means there is nowhere for the grub boot loader on the new pool disk.   As the old pool disks were physically present and did have the necessary reserved space,  I could use one of them to store the updated boot loader.
  8. reboot, select BIOS boot menu,  boot off the hard disk with the new grub installation
  9. This should boot off the new pool.
  10. Export the old pool.
    1. You might need to stop services such as samba and nfs that are depedent on the old pool first.
  11. Set up mountpoints from the new datasets
  12. Edit any other dependencies on the new pool name (e.g. virtual machine volumes)
  13. Now you are running on the new pool.
  14. Once you are absolutely sure you have everything you need from the old pool, import it and then destroy it.
  15. Do a label clear on each of the partitions to be used in the new new pool.
  16. Create the new new pool using the disks from the old pool.
  17. Repeat 5-14 to move everything to the new new pool. Except,  install the grub bootloader on all the disks used by the pool, excluding the one booting the new pool.
    1. This means you can boot into the new pool if the new new pool is broken.
  18. Export the new pool.
    1. Keep the disk for a while in case you left anything valuable behind on the move to the new new pool.
  19. Eventually, when you are happy that nothing was left behind,  import, destroy and labelclear the disk/partition used for the new pool,  and add the disk/partition to the new new pool.  Also update the boot loader on the disk that was booting the new pool.

Upgrading pfsense using a virtual environment

Summary of the running network environment

  • Pfsense runs as a virtual machine
  • There is a single trunk Ethernet connected to the host
  • The WAN connection arrives on VLAN10, courtesy of a managed switch feeding the trunk
  • The LAN connection is untagged
  • Additional VLANs provide connectivity for wireless LANs

I discovered that my pfsense was in a state where it could not update itself either from the GUI, or from the command line.   The reasons are not relevant to this item.   I wanted to rebuild it and keep the same configuration.

The challenge is how to build a pfsense instance with the same configuration, with minimum disturbance of the old configuration.

The solution is to create a virtual network environment that mirrors key aspects of the production environment.   The virtual network environment is created using features of the QEMU KVM virtualization environment, and is driving using the virt-manager gui.

  • Prerequisites
    • Sufficient host resources to run an additional 3 virtual machine instances
    • Connectivity to the host via virt-manager that is not dependent on the production pfsense instance
      • My host ran a VNC desktop session. I connected to this session from a Windows machine on VLAN0 from an interface that was configured with a static IP address.
      • I then ran virt-manager in this session, plus a root terminal to set up instance storage (using zfs).
    • Host access to the new pfsense installation image, in my case pfsense 2.4.4 AMD64.
    • My internet provider (Virgin Media) did not give me a DHCP lease unless the interface performing DHCP had a specific MAC address. The interface connecting to WAN has to be configured to spoof this address, by specifying the MAC address of the LAN (i.e., the non-tagged physical) interface in pfsense.   This configuration persists into the new instance, so the MAC addresses configured in QEMU/KVM for the virtual machines can be anything.  This is a necessary, as qemu/kvm doesn’t allow duplicate MAC addresses to be configured.
  • Create a new network in kvm that is not connected to anything, and has no IP configuration. Call this simulated-trunk.
  • Create a pfsense instance “switch” with two NICs, one connected to the default network (NAT to all physical devices),  one connected to simulated-trunk.
    • During installation, configure the “default” interface as WAN.
    • Configure VLAN 10 on “simulated-trunk” and assign to LAN.
    • This instance simulates the hardware managed switch used to place the incoming WAN on VLAN 10.
  • Create a pfsense instance “new” with a single NIC on “simulated-trunk”
    • During installation, configure VLAN 10 as WAN, and untagged as LAN.
  • Create a linux instance “app” of your favourite distro on “simulated-trunk”. This is needed to access the pfsense GUI.  This instance will be given an IP address in the 192.168.1.0/24 range.
  • Do a backup of the production pfsense GUI “prod” and put it in “app”. There are undoubtedly lots of ways to do this.  What I did was to temporarily attach a second NIC to the “app” virtual machine linked to the host “br0”.  I could then access host resources and copy the file.
    • I also downloaded and saved /root/.ssh/id_rsa used indirectly by my acme configuration.
  • Connect to the “new” pfsense gui from “app”, which is probably at 192.168.1.1.
    • Install any packages used by the production environment.
    • Do a restore from the backup file.
    • At this point, if it worked, “new” will reboot. Follow progress on the virt-manager instance console.  The boot should complete showing the production interfaces and their assigned IP addresses.
  • Pause “prod” and “new” pfsense instances
  • In virt-manager, change the network of “new” to its production value (br0 in my case).
  • There should be no further need for “app” or “switch”
  • Un-pause “new”
  • Using a web browser, connect to the “new” gui, now on the production network.
    • Go to status/interfaces.
    • Renew the IP address of the WAN interface. You should see it get an IP address, which will most likely to be the same one as previously provided.
    • Do any final adjustment. In my case, I created /root/.ssh from the console,  uloaded /root/.ssh/id_rsa from Diagnostics/Command Line, and set permissions to 400 from the console.  I tested that my acme scripts worked, and were placing a copy of the certificates into a directory on my web server using scp.
  • Do some sanity testing, but it should all be working now.
  • Connect the old “prod” instance of pfsense to the simulated-trunk and power it down, or just power it down. You can keep this as a backup.  You can switch back to it by switching the QEMU/KVM settings for the NIC network.  Obviously,  don’t have them connected to the same network and running at the same time.

Network update

Following the server update,  I thought it was time to update the network.

Historic view of the network:

  1. Earliest network, circa 1998 – 9600 bps ntlworld modem dial-up
  2. First cable modem,  circa 2000, from memory, 1Mbps speed.   As I was working from home, I installed a firewall (3M), switch (10 Mbps), a WiFi access point and Ethernet to a couple of computers.
  3. The speed increased as various upgrades from ntl were provided.  At some point it exceeded 10 Mbps,  at which point, I relied on an ntlworld cable modem also acting as router and WiFi access point.  Time passes…
  4. Circa 2014, Virgin Media hub 2 had endless problems.   Reverted to cable modem sans router/wi-fi, with separate router,  being a Western Digital MyNet 600.  Cisco AP added.  Ethernet to garage and shed.  100 Mbps switches throughout.
  5. Updated server.  Update Virgin media service to 200 Mbps.  Hence the need to update my network infrastructure as the WD router was 100 Mbps only.

So this is the starting point for the new infrastructure:

  • VM modem providing 200 Mbps, not acting as router or access point
  • Single Ethernet cable to garage hosting my sparkling new server
  • Cisco AP, and Western Digital AP re-usable
  • 1 Gbps 48 port switch in the house

I installed pfsense on my server in the garage to handle firewall/router activities.

I bought a netgear 8-port managed switch,  and used the cable to the garage as a trunk to carry the WAN connection on a VLAN.  That means if I do a speed test from the house to Ookla, for example,  the WAN traffic traverses the cable to the garage twice,  once on a VLAN destined for pfsense running as a virtual machine on my server,  and once one the way back to the client device running the speed test (Windows 10 PC in the house).  I suppose this might eventually become a bottleneck, but at the moment it is not.

I also reconfigured the Cisco AP to support VLANs,  and provided additional VLANs from the router to support secure and guest traffic via two SSIDs.  Guest network managed by rules in the pfsense firewall to prevent access to the secure network.

I re-used the WD MyNet by installing OpenWRT v18.  This allows a similar setup to the Cisco AP,  except that its switch doesn’t allow a single port to support both tagged and untagged traffic.

I also set up OpenVPN on pfsense to support remote access to the network.

The final result:
200 Mbp+ observed on Ookla from house PC.
1 Gbps between all wired devices (except MyNet).
Cisco AP and MyNet both supporting two networks for secure and guest access.


My wordpress sites were hacked :0(

I serve a couple of wordpress sites.   These were hacked on Sunday (2018-08-12).

The symptoms of the hack were:

  • <head> element of page is dynamically altered to include a call to polonofiex.ga/sim.js
  • this script redirects the browser window to an adware site, and creates a cookie to avoid reentering the adware site for some period of time.
  • polonofiex.ga/sim.js is the result of a call to src.eeduelements.com/get.php.   I surmise the indirection is so that different sites can be used to host the “sim.js” code.
  • The src.eeduelements.com/get.php reference is inserted through a corrupted jQuery.js: cdn.eeduelements.com/jquery.js?ver=1.0.9
  • You can find this in your theme header.php files.

I cleaned one of the sites (the much more complex one) by blowing away the directories,  unpacking a clean wordpress,  overwriting with selected files from a copy of the old tree for media.  Re-installing the plugins.  Installed wordfence to beef up security.  Note, I left the database in place.

I cleaned the simpler site by installing wordfence and running a scan.   This repaired a core file (header.php) infected with the jquery change.  I deleted and re-installed my theme.   Time will tell whether the infection re-appears,  but I’m hoping wordfence will help.

Server Upgrade

One of the things it appears I do from time to time is to upgrade my server infrastructure.

The motivation to do this is in part to replace a noisy and power-hungry server (Dell Poweredge 2950,  which sounds like a cross between a jet engine and a washing machine) with something better.  It is also in part to increase my storage beyond its current 4TB.  And finally in part to play with shiny new toys.

In the past, cost has been a major concern as these projects were essentially done on my pocket money using eBay purchases.  Having more-or-less retired,  but also doing some consultancy on the side,  I decided to route some of  this income into the new server project and not to constrain myself to second-hand hardware.

The hardware of this upgrade is essentially identical to that Brian Moses’ 2017 server build. I used 6 8TB WD red drives,  which are designed for 24/7 operation in servers.   Total cost around £3500.

For software, I started with FreeNas runniing from a usb thumb (if you’ve got tiny thumbs) drive.

The new server supports IPMI.  The manufacturer of the board (SuperMicro) provides an IPMI program that runs on my windows 10 machine.  The killer feature is the kvm connection,  which provides a window showing what’s showing on the host machine VGA adapter, and accepts input.  It also supports virtual storage,  which is how the installation DVD image is connected.

Much later I discovered that all the features supported over IPMI are also available on a browser gui at the BMC IP address,  so IPMI is not strictly needed.   I didn’t know this at the time of the install,  so it changes nothing.

The FreeNas version 11.1 software installed flawlessly and effortlessly allowed me to create nfs and samba shares.  My old NAS was a FreeNas 11.1 virtual machine on my old server.  ZFS send/recv allowed me to  move my major datasets.   The discs of the old VMs were logical volumes managed by Linux lvm on the poweredge.  I created snapshots of the running lvm (lvcreate –snapshot), and copied them to the new server,  where they are zvols by piping the output of dd into ssh running dd to write the device.   Worked flawlessly.

Along the way I replaced my 100Mbps ethernet switch near the server with 1Gbps so that the old and new servers could exchange data at this speed, and did indeed observe transfers going at this speed.   I also discovered that the wiring to the servers (in the garage) from the house was perfectly capable of supporting 1Gbps.   So if I’d done this £25 upgrade years ago,  I could have had 10x throughput to my file server from the house.   Oh well,  at least I discovered this now.

The new hardware is hopelessly over specified when it comes to networking.   It has two 10GB and two 1GB Ethernet ports.   I use just one of these at 1 GB.   I did look at a lower-cost Xeon single board computer, but decided to follow exactly Brian’s configuration, which was known to work.  If I upgrade to 10GB in the future, perhaps to add a compute server, at least this hardware will support it.

The big question  for me was whether FreeNas could support the virtual machines I want to run,  or whether I needed to create a separate hardware host for these.  I hoped the former, because I didn’t want to shell out any more money for a virtual machine host.

FreeNas 11.1 supports virtual machines using bhyve.  Support is rudamentary – for example,  there is no pause, save or restore.   You can only specify a vnc console for a UEFI VM, which is a pain because there is no way to debug a bios booted VM.   This constraint created a problem for me because all my running VMs were bios mbr boots.   Needless to say,  the images ported over didn’t do anything useful.

I followed the instructions by Oded Lazar to move my network infrastrucuture server (Fedora 22, bind, dns, ldap, openssh) to UEFI, and had it running effortlessly.

I then tried to move my freepbx image, and found no obvious way to port this to UEFI.  So I rebuilt a UEFI-booted VM using the latest freepbx 64 bit image.   All kinds of things appeared to be going wrong.  A fresh install showed (on the Freepbx control panel) that it couldn’t talk to the Asterisk server.   I installed three different recent releases,  and they all showed something similar.

I had no confidence in the new freepbx installation.  I don’t know if this was a problem with freepbx itself, or some kind of interaction with the bhyve environment.  A later install of the same software on a virtual machine under QEMU worked fine. Anyhow,  it made the decision for me to ditch FreeNas as a VM host.   So the next question was whether to keep freenas and add a compute server,  or to replace freenas.   Having spent enough on this project,  I decided to replace freenas.

Because the OS is running from a USB flash drive,  it is trivial to pull it and keep it safe.   So I installed Ubuntu 18.04 LTS onto a flash drive and used this to host the new machine.

It is easy to find instructions on how to support ZFS.  The man pages are comprehensive, and I’ve a reasonable amount of experience using it.   I don’t need the shiny FreeNas user-interface because once set up,  my configuration of shares is not going to change very much.

I did install zfs-auto-snapshot,  which does exactly what it sounds like.

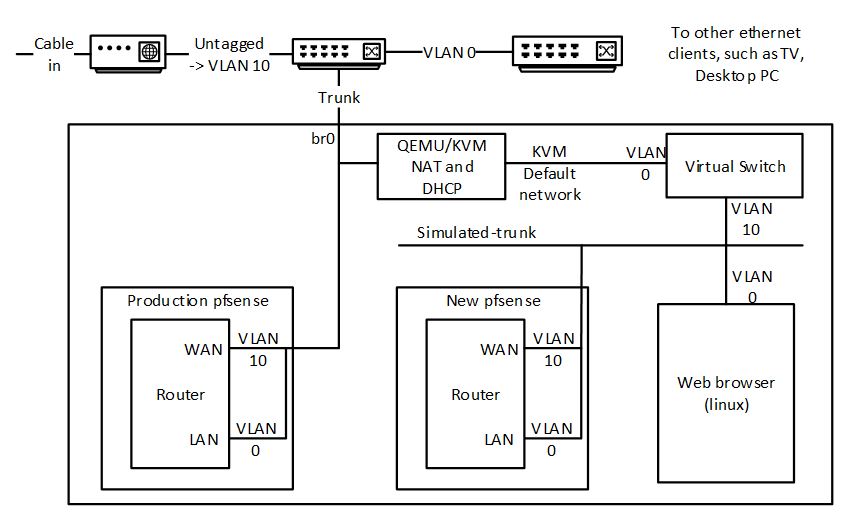
I installed virt-manager, kvm-qemu and set up bridged networking.  The images copied from the old server ran without a hitch.

Ubuntu was running from the flash.  The next job was to get the server booting and running from zfs.  This took some messing around.   But I eventually have it.  See Phillip Heckel’s description.

Summary of process to get native boot from zfs.
Using gdisk, Repartition disks so that there is a 1M partition of type EF02 (“Bios boot partition”)
Create zfs pool p3
Create p3/root, not mounted.   (p3 is my pool name, you can guess what p1 and p2 were).
Create p3/root/ubuntu,  canmount=yes,  mountpoint=none,  manually mount it at /root.
(this was where I had an issue with various instructions.  It seems that mountpoint none is
required for the initramfs to work.  I didn’t bother to research further.)
create p3/boot mounted at /boot.
copy everything from running system root to /root, excluding dev,sys,proc,boot which are mounted –bind.
Chroot /root
update-initramfs
update-grub
for each disk in the zfs array: grub-install /dev/sd<x> –modules=”zfs part_gpt”   (this modules parameter is probably unnecessary)

That’s it.  If the root file systems gets toasted somehow,  I can boot ubuntu off a flash drive and use zfs tools to roll back to one of the snapshots.

Christmas 2017

64 Lamb’s Lane, Cottenham, Cambridge, CB24 8TA, UK.  Adrian.stephens@ntlworld.com Christmas 2017

The Stephens’ Christmas newsletter, 2017

It’s that time of the year.   Our American friends are giving thanks, and their turkeys are looking for a place to hide.  So we turn to thoughts of Christmas:  praising God for the gift of his son; mince pies; silly party games and loving family to share it all with.

Continue reading

Christmas Letter 2016

Well, it’s that time of year.  Our American friends have already stuffed, cooked and consumed their turkeys.  We can look forward to the same in a few weeks.  So it is time to cast a retrospective eye on the happenings of the year.

What a busy year it has been.  Two weddings, a funeral and a semi-retirement.

We said goodbye to Aunt Eileen, who lived with my parents.  She had suffered two strokes and found life very difficult.  She died in May.  Adrian and Tina were out of the country at the time, but Sarah and David were able to attend to pay their respects.  She was much loved and will be missed.

Our son David married Eleanor Fountain in Bar Hill (near to Cambridge).  They had a lovely wedding on a hot summer’s day.  They live in Bar Hill along with (from time to time) a cat, a pug, a sister (until recently) and two chickens.  They are also expecting a baby in May next year.  David continues to work for the fire service in London. The photos are here: https://chezstephens.org.uk/piwigo/index.php?/category/765.

Our daughter Sarah married Derek Archer near their home in Raunds.  Adrian got to give her away, which meant a ride in a 1932 Rolls-Royce to the hotel venue where the wedding took place.  Unfortunately it rained, but that didn’t dampen folks’ spirits.

The photos are here:  https://chezstephens.org.uk/piwigo/index.php?/category/772. Counting Derek’s two children Jaden and Kyson we now are proud grandparents of 3, 5 (including step-grandchildren) or 6 (including ex-step-grandchildren).  Sarah continues to enjoy her work for the police looking (medically) after those in custody.  She is studying for a master’s.


Our daughter Ruth has a boyfriend John, who is in the US air force.  As I write, she is gallivanting round the USA (Chicago, Washington, New York, Maryland) to “meet the family”.  She continues to enjoy her work at the Cambridge Botanic gardens doing things with plant DNA.


Tina and Adrian are thankful that they are decaying gracefully at no more than the expected rate.  Adrian’s condition is stable. Pity his fashion sense hasn’t improved.


Tina’s Aunt Elsie had a fall at the end of last year and spent quite a lot of time in hospital (which was a strain on Tina) as they tried to work out her medications and care package.  We are thankful with the provision of a full time care assistant that allows her to keep her independence.

Adrian was offered a separation package from Intel, somewhat out of the blue.  As big American corporates often do, they needed to do a “headcount reduction” of about 10%.  This time they were “cutting from the top”, and I got offered the choice of taking voluntary redundancy.   I took the offer, and subsequently negotiated with them to support me as a consultant for the remaining 18 months of my commitment as 802.11 chair.  This happened during our May holiday.  He continues to travel about 10 trips a year.

The separation allows me to spend more time on my own projects, such as building a church sound desk, rebuilding a window, fixing joist sag (painful).  I’ve yet to become idle.  If I do, I anticipate what my colleague Jon describes as “honeydo” projects (“Honey do this,  honey do that…”) to keep me occupied (or I might just buy a large padlock for the office, now christened the doghouse (Tina)).

We give thanks to God for the year past, with its comings and goings.   God bless you wherever you are.

Sincerely/Love/Kisses/Hugs/Manly Handshakes (according to our relationship),

Tina and Adrian Stephens xx

Christmas letter 2015

You can see the pdf version here:  2015 Stephens Christmas Letter.

Dear friend,

It is that time of year again.  The turkey is getting worried (or, if you are one of our friends from across the pond, the turkey is past worrying).  Christmas present suggestions fill the airwaves. Everybody is making preparations.  I’m wondering just what I can get Tina when she says she wants nothing.  I guess she is wondering the exact same thing.  We’re looking forward to having Eleanor’s family up for Christmas lunch.  Adrian, as, supervisor of the cooking, will try not to poison them.  He’s never actually killed anybody yet.

Adrian is still gainfully employed at Intel and as chair of IEEE 802.11, and is flying around the world (about 12 foreign trips a year) helping others create fine standards.  Tina likes to accompany him.  And as we meeting once a year in Hawaii, that’s a great opportunity for us to take a holiday.   So we did the usual and enjoyed ourselves snorkelling and eating out on Big Island this year.

We thank God for continued relatively good health and the opportunity to see the world (or certain bits of it).

Our Children are all getting hitched in various ways this coming year.  Ruth is moving up to Scotland to be with her boyfriend Rory.  We will be sad to see her move away (Tina likes her girls’ nights out), but we are pleased for them both and hope that Ruth will be happy. Rory is a fine fellow – for a Scot. Sarah and her fiancé Derek will be getting married, as will David and his fiancée Eleanor. So next year will be busy.

Tina’s Aunt Elsie had a fall and is currently in hospital with a broken elbow.

Adrian’s parents are still growing older gracefully.  He will be seeing them shortly with a hamper of goodies, and will be cooking them an early Christmas lunch too.

Our church called a new minister, and we look forward to his ministry in the Church.  Tina as treasurer has been particularly busy.
We wish you a merry Christmas and a happy and peaceful 2016.

With hugs, kisses, manly thumps on the back, etc… as (in)appropriate to our relationship.

Adrian & Tina Stephens